How to Build a Catapult Easy How to Build a Catapult for Ping Pong Balls
Bombs Away! A Ping Pong Catapult
Abstract
If you were in a raiding army in the Middle Ages, a catapult would come in mighty handy for taking down castle walls. But only if you could aim it reliably! With this science project, you will try your hand at catapult technology. Using a rubber-band-powered catapult you will send ping pong balls flying through the air. The catapult's design makes it easy to measure and repeat how hard the ball is launched and its direction, so you can find the right catapult settings to hit the target reliably.
Summary
Very Short (≤ 1 day)
None
A kit is available from our partner Home Science Tools. See the Materials tab for details.
Low ($20 - $50)
Do not aim the catapult at breakable objects or people; minor injury possible.
Recommended Project Supplies
Get the right supplies — selected and tested to work with this project.
View Kit
Objective
In this applied mechanics project, students will find the right settings to reliably launch a ping-pong ball from the catapult into a target (such as a bucket or a trash can) from a certain distance away.
Introduction
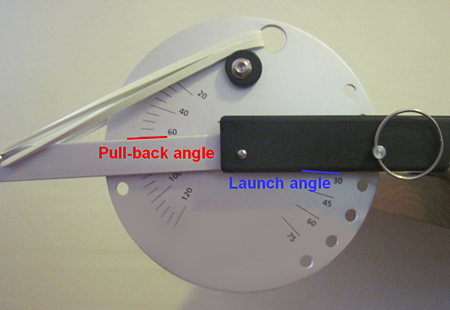
This fun project explores a simple machine, the catapult. In the Middle Ages these were used to hurl huge stones to break down castle walls—here you will be using a slightly smaller (and much less dangerous) version to toss ping pong balls. The catapult used for this project is easy to adjust; it also has convenient markings for reading out launch angle and "pull-back" angle (we will explain what those angles mean in the next paragraph).
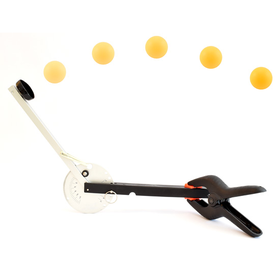
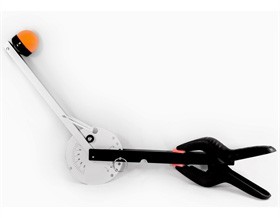
The base of the catapult, shown in Figure 1 above, is attached to a surface (such as the edge of a table) with a clamp. The ball (either a ping pong ball or a Wiffle® ball) sits in a cup at the end of the "launch arm," which is attached to the base. The catapult is powered by rubber bands, which connect the launch arm to the "disk." The disk makes it easy to measure and set the launch angle and the pull-back angle. The pull-back angle is how far you pull the launch arm back before you launch the ball. The launch angle is the direction the ball travels (relative to the ground) when it is launched. So, a launch angle of 90 degrees means the ball will go straight up, and a launch angle of 0 degrees means the ball will go horizontal. You set the launch angle by placing the pin through holes that line up on the disk and the base of the catapult. Figure 2 below can help you understand these angles. We will explain how to measure them in the Experimental Procedure.
You can change four things to adjust how far the ball goes:
- The type of ball (ping pong or Wiffle)
- The number of rubber bands (up to three)
- The launch angle (from 0 to 75 degrees)
- The pull-back angle (from 0 to 120 degrees)
Think about how each of these things will change how the ball is launched, and which ones you will want to adjust to make the ball hit your target.
Terms and Concepts
Before continuing with this project, make sure you understand the following terms and concepts. We have defined some of them for you in the Introduction, but you might need to look others up on your own.
- Catapult
- Angle
- Degree
- Pull-back angle
- Launch angle
- Gravity
- Trajectory
Questions
- Which launch angle will cause the ball to travel farthest?
- If you increase the pull-back angle, what will happen to the launch distance?
- If you increase the number of rubber bands, what will happen to the launch distance?
Bibliography
- Real-World Physics Problems. (2012). Catapult Physics. Retrieved September 27, 2012.
- The Physics Classroom. (2012). Projectile Motion. Retrieved September 27, 2012.
Materials and Equipment 
- Ping Pong Catapult Kit is available from our partner Home Science Tools. The kit includes:
- Catapult with easy to change settings
- Rubber bands (3, each 3 x 1/8 inch)
- Ping pong ball
- Plastic Wiffle ball
- Clamp for attaching the catapult to a surface.
- Surface for mounting catapult (piece of wood on the floor, tabletop, etc.)
- Optional: paper towels, dish towel, or other padding for protecting the mounting surface from being scratched by the attachment clamp
- Open area for launching balls
- Bucket or shoebox for catapult target
- Tape measure (12 ft. minimum)
- Lab notebook
Disclaimer: Science Buddies participates in affiliate programs with Home Science Tools, Amazon.com, Carolina Biological, and Jameco Electronics. Proceeds from the affiliate programs help support Science Buddies, a 501(c)(3) public charity, and keep our resources free for everyone. Our top priority is student learning. If you have any comments (positive or negative) related to purchases you've made for science projects from recommendations on our site, please let us know. Write to us at scibuddy@sciencebuddies.org.
Experimental Procedure
Safety Note: The catapult is designed to be safe, but it can hurt you if you are not careful! Never launch a ball at other people. The launch arm can move very fast (especially when using two or three rubber bands), so always make sure your fingers and other body parts are safely out of the way before you launch the ball.
- Watch this video to learn how to set up your catapult:
- Set up the catapult and the target as shown in Figure 3.
- The recommended distance from the middle of the catapult disk to the middle of the target is 8 feet (ft.).
- Shoe boxes and buckets make good targets.
- The catapult clamp may scratch furniture, so you might want to use padding such as a paper towel when attaching the catapult.
- Make sure the catapult and the target are at roughly the same height.
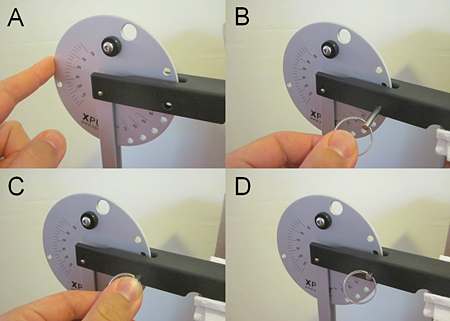
- Insert the pin with the ring attached through the hole in the catapult base, lined up with a hole in the disk. This sets the launch angle (don't worry, you can always change this angle later). Figure 4 shows you how to do this in steps A through D.
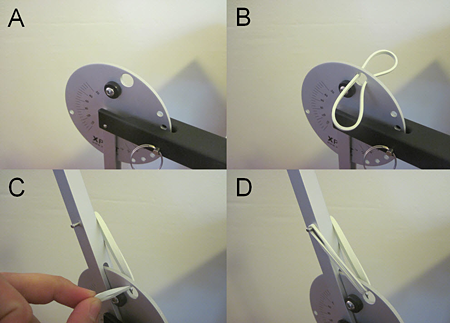
- Attach at least one rubber band (for safety reasons, no more than three) to the pins on the launch arm by threading it through the hole on the catapult's disk. Figure 5 shows you how to do this—ask an adult if you need help.
- You are almost ready to launch! First, you will need to understand how to measure the launch angle and pull-back angle from the markings on the catapult disk. Remember that the pull-back angle is how far back you pull the launch arm before you let go and launch the ball, and the launch angle is the direction the ball is going when it is launched. Refer back to Figure 2 in the Introduction tab if you need to understand the angles. Figure 6 shows you how to measure them on the catapult.
- Aim for the target, and fire away! Remember there are four things you can change: the type of ball, the number of rubber bands, the launch angle, and the pull-back angle. However, if you start changing multiple things at once, you no longer have a fair test and your results may be too confusing to interpret. So, for starters it makes sense to keep three things the same and only change one thing at a time.
- For example: you could pick the orange ping pong ball, one rubber band, and a launch angle of 75 degrees. Then you can experiment with different pull-back angles without changing anything else, and find out what pull-back angle works best to hit the target.
- Go back to the Questions outlined in the Background tab, and try to use those to help you hit the target.
- For example, do you think adding more rubber bands will make the ball go farther or less far?
- Maybe you find that your ball is always falling a few feet short of the target. If so, go back and pick another variable to explore. For example, should you make the pull-back angle bigger or smaller if that happens?
- See if you can find different combinations of settings that enable you to hit the target. Are some settings more reliable than others? An easy way to measure this is to take ten shots at the target with the same settings and count how many hit the target.
- Note that, depending on the material of your target, the ball may be more likely to bounce out (for example, a hard metal pot instead of a softer cardboard shoebox). But you can still count bounce-outs as a "hit."
- Also, the catapult may move or wiggle slightly if you launch the ball really hard. If you notice that you are missing your target far to the left or to the right, it is fine to adjust the clamp and re-aim your catapult.
- Write down your results in a table similar to Table 1. This shows just one example of how a data table could be used to keep track of results for a certain test.
- Have you found some methods that are more successful at hitting the target than others? Why do you think this happens?
Troubleshooting
For troubleshooting tips, please read our FAQ: Bombs Away! A Ping Pong Catapult.
![]()
Ask an Expert
Do you have specific questions about your science project? Our team of volunteer scientists can help. Our Experts won't do the work for you, but they will make suggestions, offer guidance, and help you troubleshoot.
Variations
You could do many things to make this project more fun or challenging. Here are just a few ideas:
- The directions say to put the catapult and the target at the same height. What happens if you don't do this? For example, if you put the catapult on a table and the target on the floor, or the other way around? Do your results change if you try the same experiments?
- Buckets and shoe boxes are pretty big targets. Is your aim good enough to hit a much smaller target, like a coffee mug?
- What happens if you change the distance between the catapult and the target to something other than 8 ft.? How much do you have to adjust your settings to hit the target?
- What happens if you launch an object other than the plastic balls supplied with the catapult kit? For example, a small toy, or a wad of paper? Do you have to use different settings to hit the target? Safety: remember, never aim the catapult at a person, and do not launch sharp objects or things that might break—for example, anything made of glass.
Frequently Asked Questions (FAQ)
Q: The ball doesn't travel exactly the same distance each time, even when I use the exact same settings. What am I doing wrong?
A: This is OK! Due to many small, random effects beyond your control, like the catapult wiggling a bit between shots, or even air currents in the room, the ball will not travel exactly the same distance every time. In almost all "real world" experiments, you will not get the exact same results every single time.
Q: My catapult seems to move side-to-side slightly after each shot. How can I prevent this?
A: Depending on the surface material you are clamping to, the single clamp provided with the catapult kit may not hold the catapult perfectly still, especially when using two or three rubber bands. The catapult may wiggle a bit after each shot. This wiggle will may affect your left-to-right aim but will not have a significant effect on your distance or vertical trajectory. If you would like to eliminate the wiggle try stacking heavy objects, like textbooks, on top of the catapult base — just make sure they don't interfere with movement of the launch arm.
Q: How do I set the launch angle on the catapult?
A: The launch angle is set by inserting a metal pin through holes on the aluminum disk that align with the black metal base of the catapult. This picture shows the process:
Q: How do I attach the rubber bands to the catapult?
A: The rubber bands go through a hole in the circular aluminum disk, and hook onto pins on the launch arm. This picture shows the process in four steps:
Q: How do I measure the launch angle/pull-back angle?
A: The launch angle and pull-back angle are measured by tick marks on the side of the aluminum disk. When facing the writing on the side of the catapult, the launch angle tick marks will be on your right — they line up with the bottom edge of the base of the catapult (the black part that should be clamped to a table). The pull-back angle tick marks are on your left — they line up with the top edge of the launch arm. This picture shows how to read each angle:
Note: On older versions of the Xpult brand catapult, the pull-back angle may be read from the bottom edge of the launch arm. If you just ordered a new Science Buddies catapult kit for your project (as of October 2012), then you should follow the directions above.
A: The ball is likely to bounce out of targets like metal pots or hard plastic trash cans, which can make chasing it all over the place annoying (especially if it rolls under furniture). Place a crumpled-up hand towel or t-shirt in the bottom of your target to reduce bouncing. Remember though - any shot that lands inside the target, even if it bounces out, still counts as a successful hit.
A: First, make sure the box you are using for a castle wall isn't too big or heavy. We found that empty cereal boxes work well. A full cereal box will be much too heavy. Second, adjust your settings and aim — try using a different number of rubber bands, or switching your aim to a different part of the wall (top/bottom/middle). Remember, change one variable at a time and keep a good data table in order to figure out what is working!
A: This is most likely due to poor lighting conditions. Many video cameras will automatically adjust their exposure time depending on the brightness of the scene. A poorly lit area will result in a longer exposure time, to let more light into the camera — however, this will also make fast-moving things appear blurry. If possible, try filming outside in direct sunlight (but not on a windy day!), or use extra lamps if filming indoors (remove lampshades to increase brightness).
Depending on your camera, you may also be able to manually adjust settings and decrease the exposure time. Consult your camera's manual to see if that is possible.
A: If your theoretical and experimental results don't match up exactly, but are "reasonably" close to each other (for example, both show the ball going a couple meters before it hits the ground), then this is perfectly normal. There are parameters in both the theoretical predictions and the experiments that can vary slightly and affect your results. For example, the spring coefficient of your rubber bands could be slightly different than the number we provided, and if your catapult is not clamped down very well, the actual launch angle could be slightly different from the launch angle you set, as the catapult can "bounce" a bit during launch. All of these factors can contribute to make your experimental and theoretical results slightly different — but this is OK.
If your theoretical and experimental results are very different, there are a couple things you can check:
- Are your theoretical predictions reasonable? You should be able to launch the ball across an average-sized room in your house — meaning it should go a couple meters before it hits the ground, for typical catapult settings. If your predictions indicate that the ball will travel several kilometers, or only a couple millimeters, then odds are you made a mathematical mistake. Double-check your calculations, and be extra careful to look for typos if you entered equations into a spreadsheet program.
- Make sure you properly used a scale factor to convert the distances you measure on your computer screen to real-world distances for your experimental data. Again, make sure the distance the ball travels is reasonable — if your experimental data says that the ball traveled 100 meters, then you probably used the scale factor incorrectly.
A: The first thing you can do is try to adjust the bin size of your histogram — how you group and count the frequency of your data. A bin size that is too small or too large will make it difficult to see the true shape of the distribution. Here are four different histograms for the same set of data, all with different bin sizes:
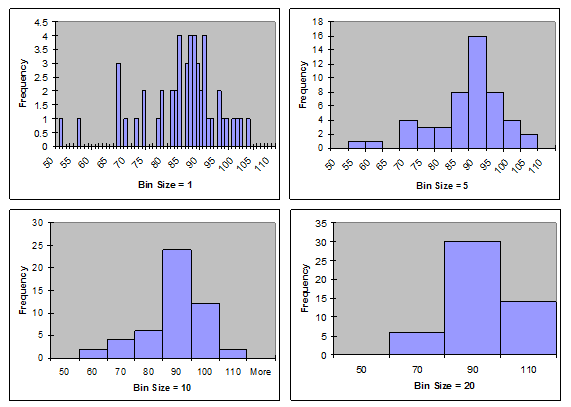
Four example histograms display the same data with bin sizes of 1, 5, 10 and 20. As the bin sizes change, the distribution of data becomes too compact or spread out to determine whether or not the data is normally distributed from a glance. Bin sizes of 5 and 10 show a clearly normal distribution of data, but bin sizes of 1 and 20 are less obvious.
Notice how the shape of the distribution is evident with bin sizes of 5 or 10, but rather difficult to see with bin sizes of 1 or 20. As a general rule of thumb, more data will allow you to use a smaller bin size, which will give you a more accurate picture of the distribution — so if you have time, try to do more than 50 trials with the catapult.
A: First, it is essential to have two people for this part of the project — one to operate the Xpult, and another to record the distance the ball travels. You won't be able to do both by yourself.
For the person recording distances, we recommend watching where the ball lands and immediately marking the location with your finger. Then take a reading from the tape measure. Trying to watch where the ball lands and simultaneously read the tape measure will be very difficult.
Also, you probably won't be able to get fraction-of-an-inch accuracy on your readings — getting the closest one-inch increment will be good enough.
Careers
If you like this project, you might enjoy exploring these related careers:
Career Profile
Mechanical engineers are part of your everyday life, designing the spoon you used to eat your breakfast, your breakfast's packaging, the flip-top cap on your toothpaste tube, the zipper on your jacket, the car, bike, or bus you took to school, the chair you sat in, the door handle you grasped and the hinges it opened on, and the ballpoint pen you used to take your test. Virtually every object that you see around you has passed through the hands of a mechanical engineer. Consequently, their… Read more
Career Profile
You use mechanical devices every day—to zip and snap your clothing, open doors, refrigerate and cook your food, get clean water, heat your home, play music, surf the Internet, travel around, and even to brush your teeth. Virtually every object that you see around has been mechanically engineered or designed at some point, requiring the skills of mechanical engineering technicians to create drawings of the product, or to build and test models of the product to find the best design. Read more
Career Profile
Physicists have a big goal in mind—to understand the nature of the entire universe and everything in it! To reach that goal, they observe and measure natural events seen on Earth and in the universe, and then develop theories, using mathematics, to explain why those phenomena occur. Physicists take on the challenge of explaining events that happen on the grandest scale imaginable to those that happen at the level of the smallest atomic particles. Their theories are then applied to… Read more
If you have purchased a kit for this project from Science Buddies, we are pleased to answer any question not addressed by the FAQ above.
In your email, please follow these instructions:
- What is your Science Buddies kit order number?
- Please describe how you need help as thoroughly as possible:
Examples
Good Question I'm trying to do Experimental Procedure step #5, "Scrape the insulation from the wire. . ." How do I know when I've scraped enough?
Good Question I'm at Experimental Procedure step #7, "Move the magnet back and forth . . ." and the LED is not lighting up.
Bad Question I don't understand the instructions. Help!
Good Question I am purchasing my materials. Can I substitute a 1N34 diode for the 1N25 diode called for in the material list?
Bad Question Can I use a different part?
Contact Us
Related Links
- Science Fair Project Guide
- Other Ideas Like This
- Mechanical Engineering Project Ideas
- My Favorites
News Feed on This Topic

, ,
Cite This Page
General citation information is provided here. Be sure to check the formatting, including capitalization, for the method you are using and update your citation, as needed.
MLA Style
Science Buddies Staff. "Bombs Away! A Ping Pong Catapult." Science Buddies, 20 Nov. 2020, https://www.sciencebuddies.org/science-fair-projects/project-ideas/ApMech_p008/mechanical-engineering/ping-pong-catapult. Accessed 2 Sep. 2022.
APA Style
Science Buddies Staff. (2020, November 20). Bombs Away! A Ping Pong Catapult. Retrieved from https://www.sciencebuddies.org/science-fair-projects/project-ideas/ApMech_p008/mechanical-engineering/ping-pong-catapult
Last edit date: 2020-11-20
Explore Our Science Videos
Can you solve this air pressure puzzle?
Free science fair projects.
Source: https://www.sciencebuddies.org/science-fair-projects/project-ideas/ApMech_p008/mechanical-engineering/ping-pong-catapult
0 Response to "How to Build a Catapult Easy How to Build a Catapult for Ping Pong Balls"
Post a Comment